
To illustrate how to get this task done, I’ll be working with a brand new Angular CLI project. The final code for this project can be found on my GitHub repo found at https://github.com/pcalchi/SonarAngularDemo.
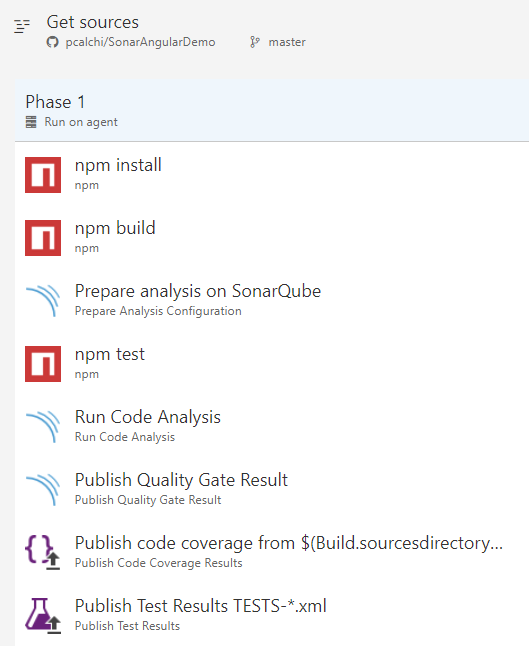
This is what the final build process looks like.
Using a hosted build agent is an option but I highly recommend using your own VSTS build agent. If you do choose to use a hosted build agent, you’ll need some additional setup. Documentation on how to get this done is available here: https://blog.angulartraining.com/how-to-running-angular-tests-on-continuous-integration-servers-ad492219c08c.
Code Changes
Step 1:
Install the Karma JUnit reporter as a build dependency.
npm i --save-dev karma-junit-reporter
Step 2:
plugins: [
  require('karma-jasmine'),
  require('karma-chrome-launcher'),
  require('karma-jasmine-html-reporter'),
  require('karma-coverage-istanbul-reporter'),
  require('@angular/cli/plugins/karma'),
  require('karma-junit-reporter'), // <- *** Add plugin ***
],
coverageIstanbulReporter: {
// ** change lcovonly to lcov and cobertura **
reports: [ 'html', 'lcov', 'cobertura' ],
fixWebpackSourcePaths:true
},
Step 3:
Modify your test NPM script to include code coverage in your package.json file. If you configured your project to PhantomJs, you’ll need to make that switch in the browsers argument.
"test": "ng test --code-coverage --single-run --browsers=Chrome --reporters=progress,junit"
Step 4:
Add a new sonar-project.properties file in the root of the project. This is the standard naming for this file, but if you need to support multiple build configurations you can have more than one of these files.
The only changes you need to make to this file are lines 2 and 4 by setting the values specific to the project you created in your SonarQube instance.
# must be unique in a given SonarQube instance
sonar.projectKey=SonarAngularDemo:f32f06f59a7043f152bf2c16a9b6a803d159a366
# this is the name and version displayed in the SonarQube UI. Was mandatory prior to SonarQube 6.1.
sonar.projectName=SonarAngularDemo
sonar.projectVersion=1.0

# Path is relative to the sonar-project.properties file. Replace "\" by "/" on Windows.
# This property is optional if sonar.modules is set.
sonar.sources=src
sonar.sourceEncoding=UTF-8
sonar.exclusions=**/node_modules/**,**/*.spec.ts
sonar.tests=src
sonar.test.inclusions=**/*.spec.ts
sonar.ts.tslintconfigpath=tslint.json
sonar.exclusions=**/node_modules/**,**/*.spec.ts
sonar.typescript.lcov.reportPaths=coverage/lcov.info
sonar.typescript.exclusions=**/node_modules/**,**/typings.d.ts,**/main.ts,**/environments/environment*.ts,**/*routing.module.ts
Step 5:
Validate your changes by running the following command:
npm test
You should now have the following files:
./Tests-{Browser}_{OperatingSystem}.xml
./coverage/cobertura-coverage.xml
./coverage/lcov.info
VSTS Build Changes
Configuring the VSTS NPM tasks illustrated in the final build process above is pretty straightforward; so we’ll just jump to the Prepare analysis SonarQube (Task #3).
Step 1:
Configure the Prepare analysis on SonarQube task. You’ll need to integrate SonarQube with VSTS, if you haven’t implemented this yet please look at this documentation: https://docs.sonarqube.org/display/SCAN/Analyzing+with+SonarQube+Extension+for+VSTS-TFS
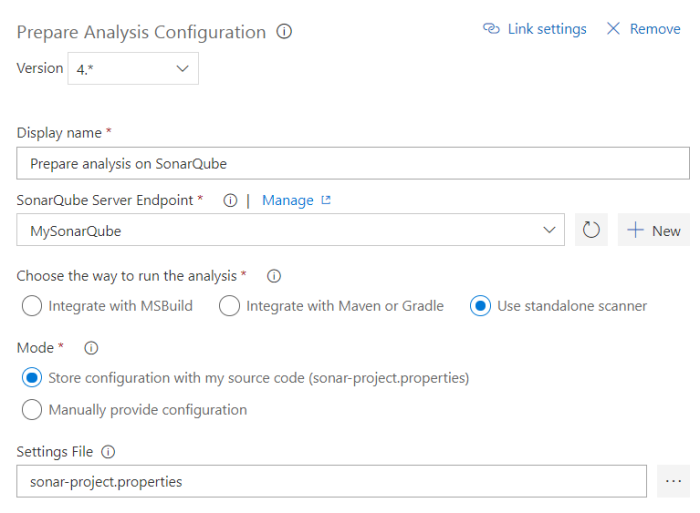
As I mentioned before, you have multiple options here. You can have multiple settings files (one per build). Another option is to omit this file altogether from your repository and just specify the SonarQube settings in VSTS by selecting the “Manually provide configuration” option.
Step 2:
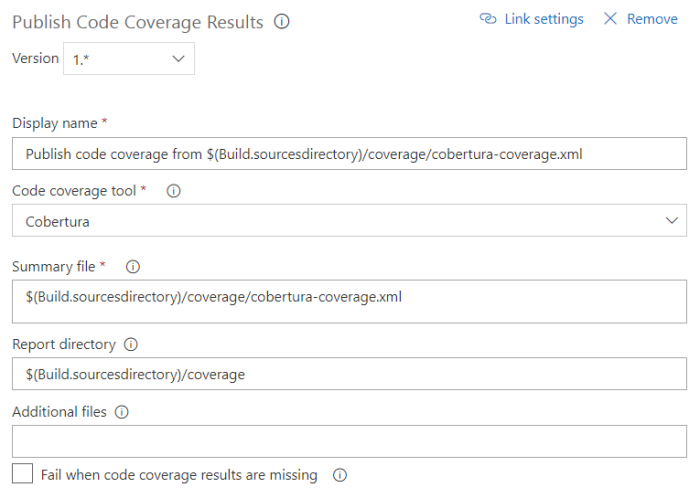
Configure VSTS to consume the Cobertura code coverage output.
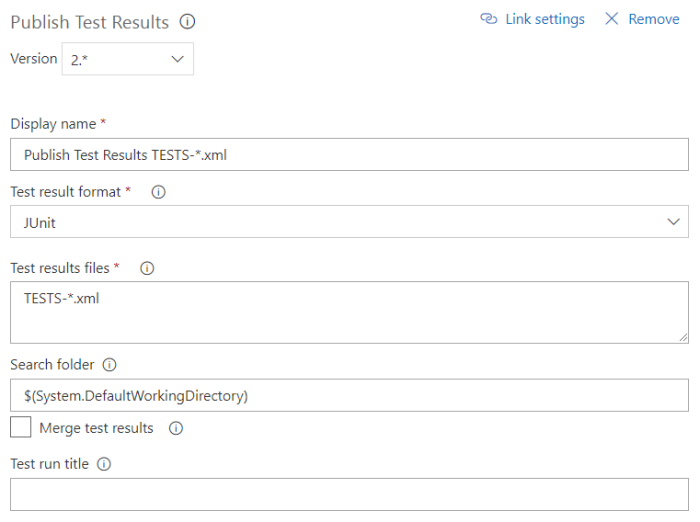
 Step 3:
Configure VSTS to consume the JUnit test results file.
The Result
That’s it! You can now run your VSTS build and you should have the following build output: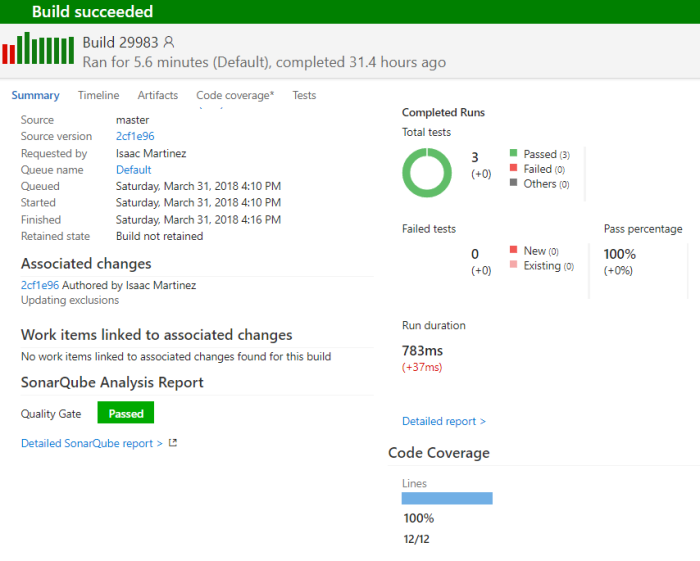
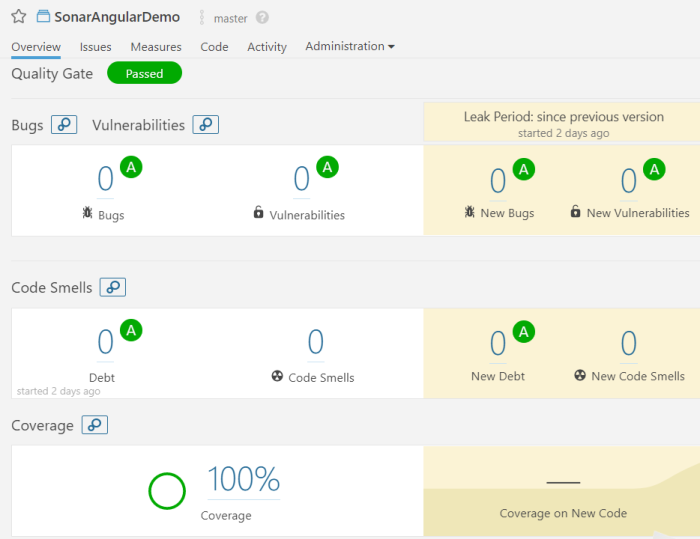
In SonarQube you should see the following:
As always if you have comments or if something is unclear, feel free to ask.

I am not able to publish\import the code coverage result on SonarQube instance, like i cannot see the code coverage result on sonar but it displays the code coverage and test results results on VSTS 2017 build when it gets completed.
I have used the below tasks in 2017 VSTS build-
1. Get Sources
2. Prepare analysis on SonarQube
3. npm install
4. npm test
5. PowerShell Script (Inline) – which replaces \ with / in Lcov.info file.
6. Run Code Analysis
7. Publish code coverage
8. Publish Test Results
9. Publish Quality Gate Result
could please let me know, if i am missing any task
LikeLiked by 1 person
Coverages report includes test file and . Spec.ts files. Shouldn’t it be only . Ts file?? Sonar qube coverage report contains report for . Spe. Ts but .ts file shows 0 coverage
LikeLike
Apologies, as I haven’t seen your comment till now. Unfortunately, this article is a bit stale at this point; I will revamp using Angular 7 and SonarCloud. I will then validate your findings.
LikeLike
Why do you exclude the *Routing.module.ts? Can’t immediately think of a reason to do so myself.
LikeLike
In my opinion, validating routing is a laborious process and really not validating my code. Routing modules are more of a configuration asset; kind of like environment.ts.
LikeLike
hi I saw you mentioned that we can have multiple sonar-project.properties file. How we can add multiple file with same name in project. Can you provide any example of such case?
LikeLike